springboot-尚硅谷

本文最后更新于:2021年12月22日 中午

一、SpringBoot入门

1.spring boot简介

spring boot的特点

  1. boot整合了spring的各种技术栈,比如security、cloud等
  2. boot简化spring的配置文件
  3. 项目可以以jar包的形式运行,而不是war
  4. boot是spring框架的框架

2.微服务

由martin fowler的一篇文章而来。微服务是一种应用架构风格。传统的单体应用,应用的所有功能都装在一个应用里,当整个项目十分庞大以后,不利于应用的扩展。所以将整个应用按照功能进行拆分,这就是微服务。 拆分后,就可以对应用的功能进行单独升级和替换。

总之,这些调整的一切目的几乎都是为了减少大型项目的复杂度,通过分工合作的方式提高效率。

3.环境配置

初始环境

  • jdk1.8+
  • maven3.3+
  • idea2017+
  • spring-boot1.5.9Release

maven配置

在maven的config文件中加上这段

1
2
3
4
5
6
7
8
9
10
11
12
13
14
<profile>
<id>jdk-1.8</id>

<activation>
<activeByDefault>true<activeByDefault>
<jdk>1.8</jdk>
</activation>

<properties>
<maven.compiler.source>1.8</maven.compiler.source>
<maven.compiler.target>1.8</maven.compiler.target>
<maven.compiler.compilerVersion>1.8</maven.compiler.compilerVersion>
</properties>
</profile>

idea配置

把idea自带的maven替换为我们自己安装的maven,路径为:settings/buildtools/maven

4. spring-boot hello world

spring boot的hello world步骤:

4.1创建maven项目,不使用模板

4.2添加spring boot依赖

1
2
3
4
5
6
7
8
9
10
11
<parent>
<groupId>org.springframework.boot</groupId>
<artifactId>spring-boot-starter-parent</artifactId>
<version>1.5.9.RELEASE</version>
</parent>
<dependencies>
<dependency>
<groupId>org.springframework.boot</groupId>
<artifactId>spring-boot-starter-web</artifactId>
</dependency>
</dependencies>

这里出现了一个问题,一开始给maven配置编译的jkd时一个标签的结束符号忘记打了,所以就导致pom一直爆红。后面查看具体错误报告时才发现问题所在,所以以后要仔细检查错误报告。

4.3编写代码

4.3.1创建spring boot 主类
1
2
3
4
5
6
7
@SpringBootApplication
public class HelloWorldMainApplication {
public static void main(String[] args) {
//启动代码
SpringApplication.run(HelloWorldMainApplication.class,args);
}
}
4.3.2创建controller类
1
2
3
4
5
6
7
8
@Controller
public class HelloController {
@ResponseBody
@RequestMapping("/hello")
public String hello(){
return "Hello World!-------------We live in a world.";
}
}

4.4 运行spring boot主类,就是HelloWorldMainApplication类

4.5 简化部署

通过把项目打成jar包的形式简化部署的流程,jar包内置tomcat,意味着即使服务器没有tomcat也可以运行项目。

添加插件的依赖后即可打jar包。

1
2
3
4
5
6
7
8
9
<!-- 这个插件,可以将应用打包成一个可执行的jar包;-->
<build>
<plugins>
<plugin>
<groupId>org.springframework.boot</groupId>
<artifactId>spring-boot-maven-plugin</artifactId>
</plugin>
</plugins>
</build>
  1. 使用maven package命令进行打包
  2. 打好的包在target中
  3. 使用java -jar运行jar包

5.Hello world的细节

spring boot为我们简化了很多操作,这正是通过我们一开始导入的两个依赖完成的。

5.1 boot-starter依赖

1
2
3
4
5
<parent>
<groupId>org.springframework.boot</groupId>
<artifactId>spring-boot-starter-parent</artifactId>
<version>1.5.9.RELEASE</version>
</parent>

spring boot 的版本中心,里面有常用依赖的版本号。有了它可以少些一部分的版本号。

5.2 boot-starter-xxx依赖

1
2
3
4
5
<dependency>
<groupId>org.springframework.boot</groupId>
<artifactId>spring-boot-starter-web</artifactId>
</dependency>
<!-- 集成了spring web开发的常用依赖 -->

springboot 把一个个功能场景拆开,分成starter的形式。我们需要用什么功能就写相应的依赖,一切都会自动进行。除了boot-starter-web,还有比如boot-starter-security

5.3 @SpringBootApplication

这个注解里面也是一些额外注解(组合注解),算是为了简化注解的标注,把里面的注解都整合成一个@SpringBootApplication注解。
它就代表一个springboot应用。

@EnableAutoConfiguration/@AutoConfigurationPackage用来自动开启包扫描,它会自动扫面启动类下面的包(controller)。

自动配置注解的@EnableAutoConfiguration目的就是为了给我们的springboot程序导配置文件,导包,开包扫描,它内置了各种组件的注解,都是为了减少我们的操作步骤。

@SpringBootConfiguration,标识这是一个springboot的配置类,里面则是一个@Configuration注解,表示一个spring的注解。

6 springboot-initializer

idea中继承了一个initializer可以帮助我们快速构建一个springboot项目。

构建完成后的项目包括

  • 启动类
  • resource文件夹
    • template静态网页模板(由于内置tomcat,springboot不支持jsp)
    • static静态资源文件夹
  • application.properties:spring的配置文件

二、yaml语法与配置文件

1.yaml是什么

yaml是一种比xml更优秀的用来表示数据的文件类型。对比:

1
2
server:
port: 8081
1
2
3
<server>
<port>8081</port>
<server>

相比之下,xml将大部分字符放在了开始和结束标签上,浪费了相当多的存储空间。yaml不仅更简洁,结构也更清晰。

2.yaml怎么写

  • yaml的语法规则区分大小写
  • yaml数据的层级关系通过缩进来区分
    1
    2
    3
    4
    5
    6
    7
    # k: v 对前需要加空格,否则无法识别
    server:
    port: 8080
    name: YiAn
    # yaml中,字符串不需要被单双引号引上,单双引号的使用具有其他意义
    # 单引号表示忽略特殊字符,原样输出。比如:hello \n world 会被原样输出为:hello \n world
    # 双引号会转义特殊字符,比如:hello \n world 输出为: hello 换行符 world
  • yaml中特殊数据语法基本不变,通过层级体现
    1
    2
    3
    4
    5
    6
    7
    8
    9
    10
    11
    12
    13
    # 对象语法
    person:
    name:zhangsan
    gender:man
    #或者
    {name:zhangsan,gender:man}
    # 集合语法
    fruits:
    - apple
    - pear
    - buleberry
    #或者
    [apple,pear,buleberry]

3.获取配置文件的值

  1. 使用bean来获取yaml的值,先写一个实体类
    1
    2
    3
    4
    5
    6
    7
    8
    9
    10
    11
    12
    // 标识类为组件,只有组件才能使用容器中的功能,比如下面的注解生效
    @Component
    // 表示类为属性配置类,prefix 表示要读取的前缀。
    @ConfigurationProperties(prefix = "person")
    public class Person {
    String name;
    Integer age;
    Map<String,Object> map;
    String[] array;
    Dog dog;
    // getters and setters...
    }
  2. 添加配置文件处理器的依赖
    1
    2
    3
    4
    5
    6
    <!--导入配置文件处理器,配置文件进行绑定就会有提示-->
    <dependency>
    <groupId>org.springframework.boot</groupId>
    <artifactId>spring-boot-configuration-processor</artifactId>
    <optional>true</optional>
    </dependency>
  3. 编写测试类
    1
    2
    3
    4
    5
    6
    7
    8
    9
    10
    11
    12
    //导包的时候一定要到junit.test的包;而不是jupiter
    import org.junit.Test;
    @RunWith(SpringRunner.class)
    @SpringBootTest
    public class HelloWorldMainApplicationTests {
    @Autowired
    private Server person;
    @Test
    public void contextLoads() {
    System.out.println(person);
    }
    }
    这种方式也可以直接适用于读取properties文件

4.@Value注解和@ConfigurationProperties注解

@Value注解用于给单个属性注入值,而@ConfigurationProperties用来给整个类的属性注入。

@Value特性:

  • 单个注入属性
  • 语法严格
  • 支持spring表达式
  • 不支持jsr303数据校验
  • 不支持复杂数据(对象类型)封装

@ConfigurationProperties特性

  • 给整个bean批量注入属性
  • 语法松散,比如支持 person.lastName == person.last-name
  • 不支持spring表达式
  • 支持303数据校验
  • 支持对象封装

4.1@Value的补充知识

1
2
3
4
5
6
7
8
9
10
11
12
13
//@Value是spring的注释,用于给属性注入值
// 直接从配置文件中读取值
@Value("${person.name}")//从配置文件中读取
private String name;

// spring表达式,除了读取值还能计算
@Value("#{user.username}")//从user类中读取
@Value("#{11 * 11}")//计算值 121
private Integer product;

// 直接注入值
@Value("{测试值}")
private String testValue;

5.@PropertySource&@ImportResource&@Bean三个注解

5.1@PropertySource注解

因为一个项目一般需要多个配置文件,所以可以在类上再加上一个@PropertySource注解来指定导入某个配置文件。它只支持properties文件,不支持yaml文件。

5.2@Bean注解(Recommand)

springboot推荐使用@Bean注解进行组件注入

1
2
3
4
5
6
7
8
9
@Configuration
public class MyAppConfig {
// 标注在方法上,方法名就是组件id
@Bean
public TestConfig testConfig(){
// 返回组件类
return new TestConfig();
}
}

5.3@ImportResource注解(Deprecated)

1
2
//用于导入Spring的配置文件让其生效
@ImportResource(locations = {"classpath:beans.xml"})

6.配置文件的占位符

无论是yaml还是Properties都可以使用占位符。

1
2
3
4
5
6
7
8
car.mode = AudiA6
car.engine = X-4
# 使用随机id
car.cid = ${random.uuid}
# 使用随机的int数
car.cnum = ${random.int}
# 引用之前的值,冒号之后是默认值
car.price = 1230,000RMB${car.mode:BMW X5}

7. 多配置文件的使用

一个项目不止一个配置文件,开发环境一种配置,生产环境一种配置。所以需要学习多配置文件的使用。

7.1properties多配置文件

程序主配置文件是application.properties,其它环境的配置文件可以是application-dev.properties,通过短横杠区分不同的配置环境。最后通过spring.profiles.active=dev激活具体的配置文件

72.yaml多配置文件

yaml在一个配置文件内就可以区别多种环境

1
2
3
4
5
6
7
8
9
10
11
12
13
14
15
16
17
18
19
20
21
#主配置
#激活开发环境的配置
spring:
profiles:
active: dev
server:
port: 8009
---
#开发环境配置
server:
port: 8008
#标识环境名
spring:
profiles: dev
---
#生产环境配置
server:
port: 8010
#标识环境名
spring:
profiles: product

除了在yaml中的标识激活哪个配置,还可以通过传入启动参数的方选择激活。在idea中配置parameterspring.profiles.active,或者命令行传入spring.profiles.active=dev

8.配置文件优先级

springboot 启动会扫描以下位置的application.properties或者application.yml文件作为Spring boot的默认配置文件

1
2
3
4
5
6
7
8
<!-- file是项目路径。项目路径下config下的applicaiton配置文件具有最高优先级 -->
–file:../config/application.yaml

–file:../application.yaml

–classpath:/config/application.yaml

–classpath:/application.yaml

高优先级会覆盖低优先级的文件。如果合理使用,高低优先级配置文件还可以实现互补配置的效果,即低优先级补充配置高优先级中没有配置的文件

此外,也可以强制指定外部路径为配置文件,还是通过在启动时添加参数的方式。

1
java -jar springboot-project --spring.config.location=D:/application.properties

不过,即使是在低优先级的yaml文件中指定参数spring.profiles.active=dev或者命令行传入参数spring.profiles.active=dev,都能覆盖掉高优先级文件的配置。

9.加载外部的配置文件

项目打好包之后如果想临时更改某些配置参数,可以直接在命令号中传入具体参数名。比如临时修改端口号 java -jar springboot-helloworld.jar --server.port=8290,这种优先级最高。类似!impotant

对于打好包的项目,如果参数有很多的话,也可以直接在jar包的同级目录放一个application配置文件。
btw,.properties文件总是比.yml文件拥有更高的优先级,如果同级目录下既有一个properties又有yml,那么前者生效。

10.自动配置的原理

springboot帮我们完成了大量的配置工作,我们也可以按照需要手动配置某些值

引用笔记

1
2
3
4
5
6
7
8
9
10
11
12
13
1)、SpringBoot启动会加载大量的自动配置类

​2)、我们看我们需要的功能有没有SpringBoot默认写好的自动配置类;

​3)、(如果有)我们再来看这个自动配置类中到底配置了哪些组件;(只要我们要用的组件有,我们就不需要再来配置了)

​4)、给容器中自动配置类添加组件的时候,会从properties类中获取某些属性。我们就可以在配置文件中指定这些属性的值;

xxxxAutoConfigurartion:自动配置类;

给容器中添加组件

xxxxProperties:封装配置文件中相关属性;

10.1 @Conditional注解

springboot有许多@conditionalOnxxx注解,用于条件成立的情况,使配置内容生效。
虽然springboot内置了大量的自动配置类,但并不是全都会生效。我们可以通过在配置文件中添加 debug=on 属性,开启springboot的debug模式,从而查看当前项目有哪些自动配置类生效了。

三、日志系统

目前的日志系统类似于JDBC和数据库驱动一样。现有一个日志接口层,然后再有不同的日志接口实现类。SpringBoot使用的日志接口是SLF4J,接口实现是Logback。

1 日志的使用

和JDBC类似,使用日志使掉的是接口层的方法,不需要去关心实现层是什么样的方法。实际使用时,调用SEL4J的方法就行,尽管它有多种的实现层。

2. 日志配置文件

日志的配置文件还是依据实现类的不同来完成。毕竟sel4j只是提供一个抽象方法给我们调用。

3. 统一日志系统

一个项目中可能涉及多个框架,而不同的框架使用的是不同的日志接口。我们需要统一日志接口。

以slf4j为例:

  • 系统框架中的其它日志系统排除
  • 用中间包替换原有的日志框架,中间包是一个类似于原有框架,但实际上是转向slf4j的一个包
  • 导入slf4j的实现类

4. SpringBoot的日志关系

通过查看springboot项目的依赖关系图,我们确认了springboot使用的是slf4j作用日志接口,logback作为日志实现;同时,springboot还通过日志转换包,把其它日志系统转为slf4j,然后用logback实现。

SpringBoot能自动适配所有的日志,而且底层使用slf4j+logback的方式记录日志,引入其他框架的时候,只需要把这个框架依赖的日志框架排除掉即可。

1
2
3
4
5
6
7
8
9
10
11
<dependency>
<groupId>org.springframework</groupId>
<artifactId>spring-core</artifactId>
<!-- 排除 -->
<exclusions>
<exclusion>
<groupId>commons-logging</groupId>
<artifactId>commons-logging</artifactId>
</exclusion>
</exclusions>
</dependency>

5. springboot日志的使用和基本配置

1
2
3
4
5
6
7
8
9
10
11
12
13
14
15
16
17
18
19
// 记住是导这个包
import org.slf4j.LoggerFactory;

@RunWith(SpringRunner.class)
@SpringBootTest
public class Springboot01HelloworldQuickApplicationTests {
Logger logger = LoggerFactory.getLogger(getClass());

@Test
public void contextLoads() {
// 日志的默认输出级别,是info,所以是看不见trace和debug的输出的,但可以在配置文件中调整输出级别
logger.trace("Trace 信息");
logger.debug("debug 信息");
logger.info("info 信息");
logger.warn("warn 信息");
logger.error("error 信息");
}

}
1
2
3
4
5
# 调整日志级别
logging:
level:
com:
lee: trace

除了配置日志的级别还可以调整日志的输出格式,输入到本地硬盘的某个位置。

1
2
3
4
5
6
7
8
9
10
11
12
13
# 不指定路径在当前项目下生成springboot.log日志
# 可以指定完整的路径;
# logging.file=G:/springboot.log

# logging.path=指定日志文件的输出路径,日志文件名为spring.log
# 在当前磁盘的根路径下创建spring文件夹和里面的log文件夹;使用 spring.log 作为默认文件
logging.path=/spring/log


# 在控制台输出的日志的格式
logging.pattern.console=%d{yyyy-MM-dd} [%thread] %-5level %logger{50} - %msg%n
# 指定文件中日志输出的格式
logging.pattern.file=%d{yyyy-MM-dd} === [%thread] === %-5level === %logger{50} ==== %msg%n

6. 配置日志By文件

日志系统会读取org.springframework.boot.logging包里的配置文件,我们也可以自己写一个类似的配置文件来进行覆盖。
有两种方式:

  1. logback.xml:这种方式会直接被日志系统识别并加载
  2. logback-spring.xml:日志系统无法识别这种文件,是由springboot解析配置然后加载到日志系统中。这种方式可以使用springboot的高级功能,比如profile功能(环境选择,不同的环境不同的配置)

四、Web开发

4.1 简介

使用springboot开发,idea中使用springboot initializer选择需要的场景模块,然后编写业务代码即可。配置文件部分springboot已经帮我们做了。

但在使用中我们也需要时常思考,这个场景springboot帮忙我们做了哪些配置,我们能不能修改,能不能进行扩展?

1
2
xxxxAutoConfiguration: 帮我们给容器中自动配置组件;
xxxxProperties: 配置类来封装配置文件的内容;

4.2 静态资源的映射

先对路径做一下解释
路径的具体对应

4.2.1 webjars引入资源

这种方式通过jar包的引入资源。比如我们要使用js,就直接在pom中写依赖导入js的webjars包,然后通过localhost:8080/webjars/jquery/3.3.1/jquery.js这种路径访问即可。

classpath:/META-INF/resources/webjars/实际上是真实的路径,但springboot已经使用/webjars替换了。

WebJars查看各种jar的依赖。

4.2.2 项目静态路径映射

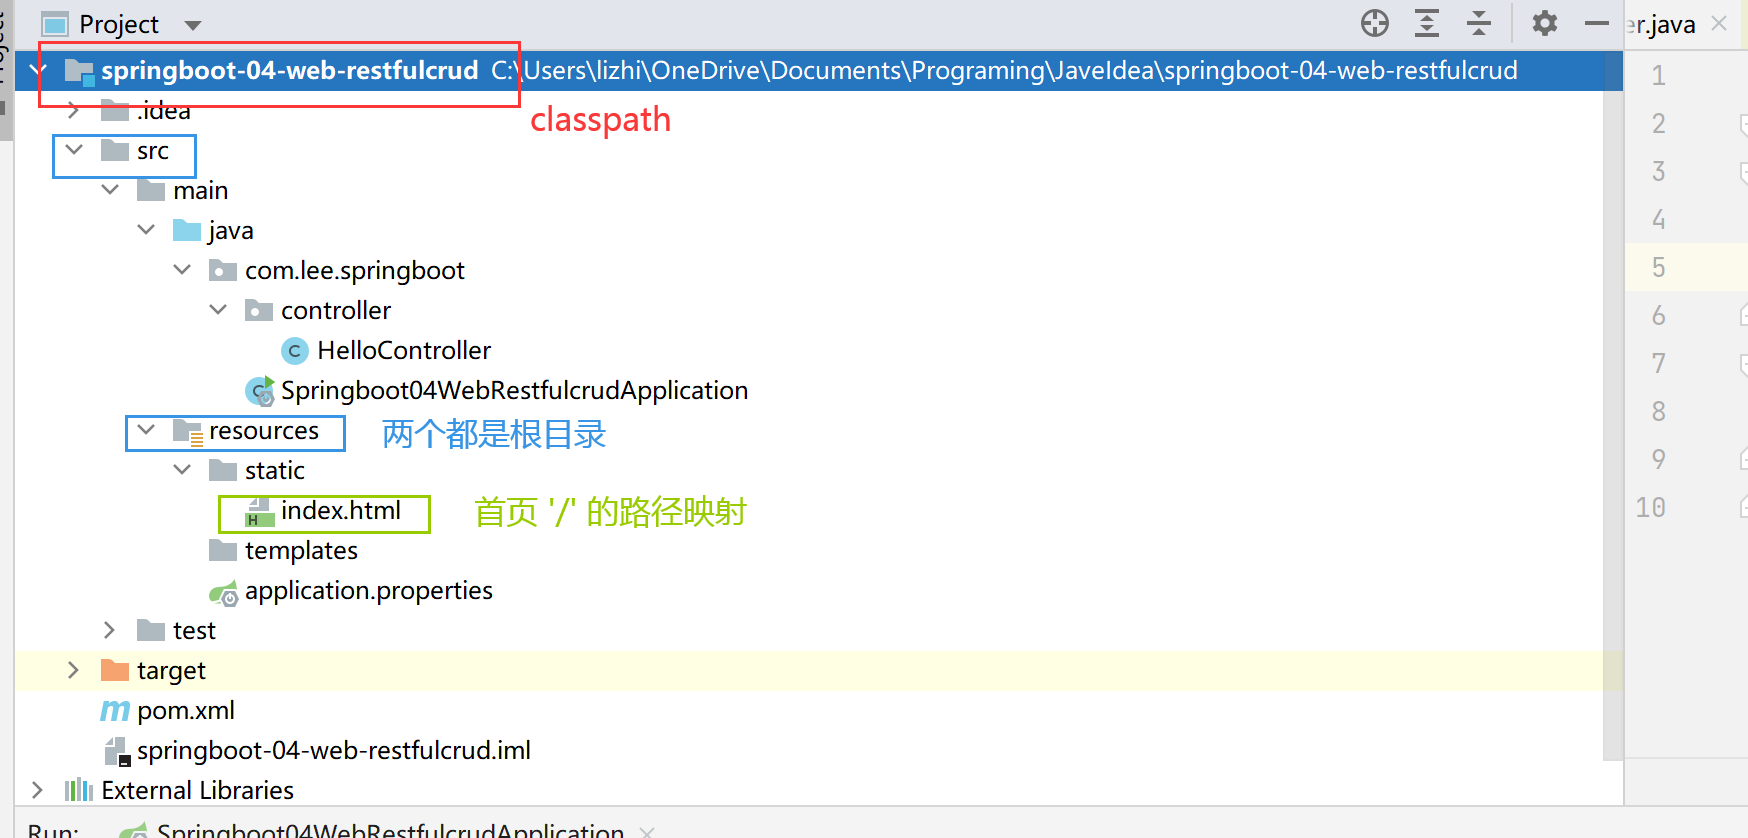
项目可以直接访问的文件目录,也就是说,用来放资源的目录。以下几个都是项目的静态资源根目录。

  • “classpath:/META-INF/resources/“,
  • “classpath:/resources/“,
  • “classpath:/static/“,
  • “classpath:/public/“
  • “/“:当前项目的根路径 重点!

这几种方式都支持引入资源,classpath为项目根目录,src和resource都是classpath

4.2.2.2 首页映射

首页的映射路径是 **/index

4.2.2.3 网站图标映射

图标的映射路径是 **/favicon.ico

4.2.3 更改项目静态路径

1
2
# 可以一次性配置多个,这个变量是个数组
spring.resources.static-locations = path1,path2

4.3 模板引擎

模板引擎用于显示动态数据,如图所示:
模板引擎的工作

jsp也是模板引擎的一种,SpringBoot推荐使用Thymeleaf模板引擎。

4.3.1 引入thymeleaf

1
2
3
4
5
6
7
8
9
10
11
12
13
<dependency>
<groupId>org.springframework.boot</groupId>
<artifactId>spring-boot-starter-thymeleaf</artifactId>
<!-- 2.1.6 -->
</dependency>

<!-- 切换thymeleaf版本,1.5.9的springboot配置的thymeleaf版本太老,我们要用新一点的 -->
<properties>
<thymeleaf.version>3.0.9.RELEASE</thymeleaf.version>
<!-- 布局功能的支持程序 thymeleaf3主程序 layout2以上版本 -->
<!-- thymeleaf2 layout1-->
<thymeleaf-layout-dialect.version>2.2.2</thymeleaf-layout-dialect.version>
</properties>

4.3.2 thymeleaf小demo

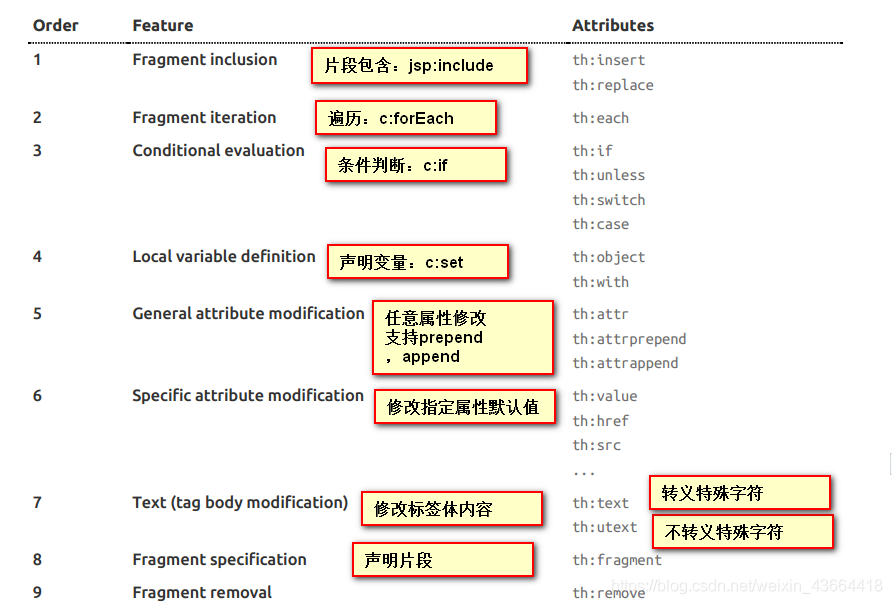
thymeleaf语法

1
2
3
4
5
6
7
8
9
10
11
12
13
14
15
16
17
18
19
20
21
22
<!DOCTYPE html>
<!--thymeleaf命名空间-->
<html lang="en" xmlns:th="http://www.thymeleaf.org">
<html lang="en">
<head>
<meta charset="UTF-8">
<title>FirstPage</title>
</head>
<body>
<!--text转义特殊字符,即直接原样输出值忽略特殊字符-->
<div th:text="${hello}">默认值</div>
<!--不转义特殊字符,支持输出各种标签-->
<div th:utext="${hello}">默认值</div>

<div>
<ul>
<!--遍历,以及[[]]的语法(和text一样)-->
<li th:each="arr : ${array}">[[${arr}]]</li>
</ul>
</div>
</body>
</html>

4.3.2.1 thymeleaf表达式语法

1
2
3
4
5
6
7
8
9
10
11
12
13
14
15
16
17
18
19
20
21
22
23
24
25
26
27
28
29
30
31
32
33
34
35
36
37
38
39
40
41
42
43
44
45
46
47
48
49
50
51
52
53
54
55
56
57
58
59
60
61
62
63
64
65
66
67
68
69
Simple expressions:(表达式语法)
Variable Expressions: ${...}:获取变量值;OGNL;
1)、获取对象的属性、调用方法
2)、使用内置的基本对象:
#ctx : the context object.
#vars: the context variables.
#locale : the context locale.
#request : (only in Web Contexts) the HttpServletRequest object.
#response : (only in Web Contexts) the HttpServletResponse object.
#session : (only in Web Contexts) the HttpSession object.
#servletContext : (only in Web Contexts) the ServletContext object.

${session.foo}
3)、内置的一些工具对象:
#execInfo : information about the template being processed.
#messages : methods for obtaining externalized messages inside variables expressions, in the same way as they would be obtained using #{…} syntax.
#uris : methods for escaping parts of URLs/URIs
#conversions : methods for executing the configured conversion service (if any).
#dates : methods for java.util.Date objects: formatting, component extraction, etc.
#calendars : analogous to #dates , but for java.util.Calendar objects.
#numbers : methods for formatting numeric objects.
#strings : methods for String objects: contains, startsWith, prepending/appending, etc.
#objects : methods for objects in general.
#bools : methods for boolean evaluation.
#arrays : methods for arrays.
#lists : methods for lists.
#sets : methods for sets.
#maps : methods for maps.
#aggregates : methods for creating aggregates on arrays or collections.
#ids : methods for dealing with id attributes that might be repeated (for example, as a result of an iteration).

Selection Variable Expressions: *{...}:选择表达式:和${}在功能上是一样;
补充:配合 th:object="${session.user}:
<div th:object="${session.user}">
<p>Name: <span th:text="*{firstName}">Sebastian</span>.</p>
<p>Surname: <span th:text="*{lastName}">Pepper</span>.</p>
<p>Nationality: <span th:text="*{nationality}">Saturn</span>.</p>
</div>

Message Expressions: #{...}:获取国际化内容
Link URL Expressions: @{...}:定义URL;
@{/order/process(execId=${execId},execType='FAST')}
Fragment Expressions: ~{...}:片段引用表达式
<div th:insert="~{commons :: main}">...</div>

Literals(字面量)
Text literals: 'one text' , 'Another one!' ,…
Number literals: 0 , 34 , 3.0 , 12.3 ,…
Boolean literals: true , false
Null literal: null
Literal tokens: one , sometext , main ,…
Text operations:(文本操作)
String concatenation: +
Literal substitutions: |The name is ${name}|
Arithmetic operations:(数学运算)
Binary operators: + , - , * , / , %
Minus sign (unary operator): -
Boolean operations:(布尔运算)
Binary operators: and , or
Boolean negation (unary operator): ! , not
Comparisons and equality:(比较运算)
Comparators: > , < , >= , <= ( gt , lt , ge , le )
Equality operators: == , != ( eq , ne )
Conditional operators:条件运算(三元运算符)
If-then: (if) ? (then)
If-then-else: (if) ? (then) : (else)
Default: (value) ?: (defaultvalue)
Special tokens:
No-Operation: _

4.4 SpringMVC的自动配置

1.5.9的springbootMVC文档地址

4.4.1 SpringMVC自动配置

Spring Boot 自动配置好了SpringMVC

以下是SpringBoot对SpringMVC的默认配置:(WebMvcAutoConfiguration)

  • Inclusion of ContentNegotiatingViewResolver and BeanNameViewResolver beans.
    • 自动配置了ViewResolver(视图解析器:根据方法的返回值得到视图对象(View),视图对象决定如何渲染(转发?重定向?))
    • ContentNegotiatingViewResolver:组合所有的视图解析器的;
    • 如何定制:我们可以自己给容器中添加一个视图解析器;自动的将其组合进来;
  • Support for serving static resources, including support for WebJars (see below).
    • 静态资源文件夹路径,webjars
  • Static index.html support.
    • 静态首页访问
  • Custom Favicon support (see below).
    • 图标定义 favicon.ico
  • 自动注册了 of Converter, GenericConverter, Formatter beans.
    • Converter:转换器; public String hello(User user):类型转换使用Converter
    • Formatter 格式化器; 2017.12.17===Date;

自己添加的格式化器转换器,我们只需要放在容器中即可

  • Support for HttpMessageConverters (see below).
    • HttpMessageConverter:SpringMVC用来转换Http请求和响应的;User—Json;
    • HttpMessageConverters 是从容器中确定;获取所有的HttpMessageConverter;
      • 自己给容器中添加HttpMessageConverter,只需要将自己的组件注册容器中(@Bean,@Component
  • Automatic registration of MessageCodesResolver (see below).定义错误代码生成规则
  • Automatic use of a ConfigurableWebBindingInitializer bean (see below).
  • 我们可以配置一个ConfigurableWebBindingInitializer来替换默认的;(添加到容器)
    • 初始化WebDataBinder;
    • 请求数据=====JavaBean;
  • org.springframework.boot.autoconfigure.web:web的所有自动场景;

    If you want to keep Spring Boot MVC features, and you just want to add additional MVC configuration (interceptors, formatters, view controllers etc.) you can add your own @Configuration class of type WebMvcConfigurerAdapter, but without @EnableWebMvc.
    If you want to take complete control of Spring MVC, you can add your own @Configuration annotated with @EnableWebMvc.
    If you wish to provide custom instances of RequestMappingHandlerMappingRequestMappingHandlerAdapter or ExceptionHandlerExceptionResolver you can declare a WebMvcRegistrationsAdapter instance providing such components.

4.4.2 扩展SpringMVC

1
2
3
4
5
6
7
<mvc:view-controller path="/hello" view-name="success"/>
<mvc:interceptors>
<mvc:interceptor>
<mvc:mapping path="/hello"/>
<bean>some.Bean</bean>
</mvc:interceptor>
</mvc:interceptors>

这是传统的springmvc的配置片段,配置了一个对hello的映射,同时为它指定一个拦截器some.Bean。

springboot中,用这段代码实现这些功能

1
2
3
4
5
6
7
8
9
10
//使用WebMvcConfigurerAdapter可以来扩展SpringMVC的功能
@Configuration
public class MyMvcConfig extends WebMvcConfigurerAdapter {
@Override
public void addViewControllers(ViewControllerRegistry registry) {
// super.addViewControllers(registry);
//浏览器发送 /atguigu 请求来到 success
registry.addViewController("/atguigu").setViewName("success");
}
}

如果只是像扩展MVC功能,只需要编写一个继承自WebMvcConfigurerAdapter类,同时加上@Configuration注解即可。

4.4.3 第一个页面的映射,login

1
2
3
4
5
6
7
8
9
// 映射/和index.html
@RequestMapping({"/","/index.html"})
public String index(){
// 返回login,springboot在字符串后拼接.html
// 然后在template文件夹中查找同名文件并进行试图映射
return "login";
}


4.4.3.1使用WebMvcConfigurerAdapter进行简单映射

1
2
3
4
5
6
7
8
9
10
11
12
13
14
15
16
17
18
19
20
21
22
@Configuration
public class MyMvcConfig extends WebMvcConfigurerAdapter {
/*视图控制器*/
@Override
public void addViewControllers(ViewControllerRegistry registry) {
super.addViewControllers(registry);
registry.addViewController("/index.html").setViewName("login");
registry.addViewController("/").setViewName("login");
}

// adapter的内部类也可以完成映射
@Bean
public WebMvcConfigurerAdapter webMvcConfigurerAdapter() {
WebMvcConfigurerAdapter adapter = new WebMvcConfigurerAdapter() {
@Override
public void addViewControllers(ViewControllerRegistry registry) {
registry.addViewController("/index.html").setViewName("login");
registry.addViewController("/").setViewName("login");
}
};
return adapter;
}

4.4.4 国际化

国际化通过配置文件实现。
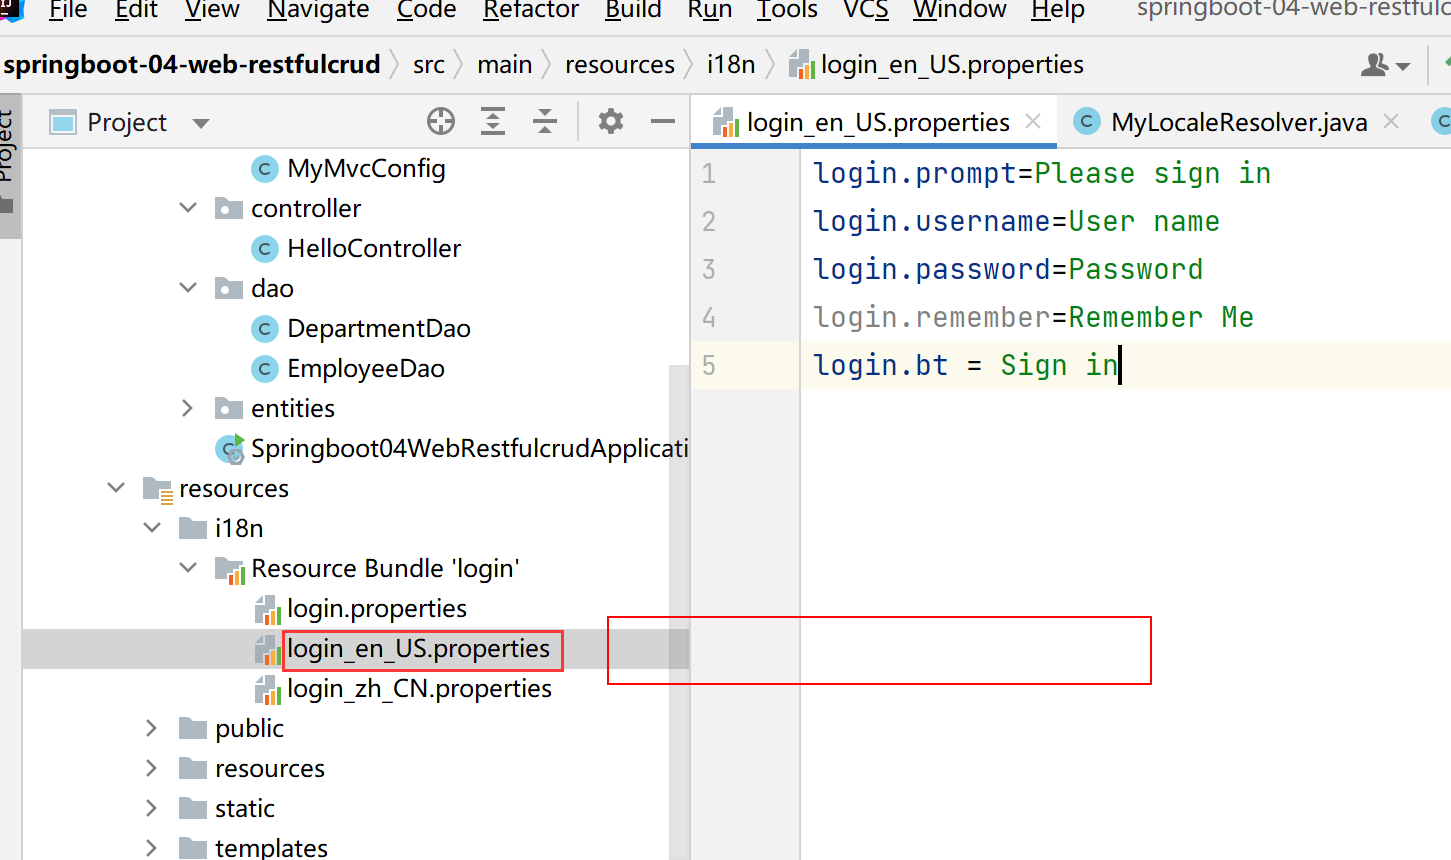
文件结构

默认情况下,springboot会读取名为message.properties文件中的国际化信息。所以我们需要在配置文件中手动改一下,spring.messages.basename=i18n/login指定我们的国际化文件位置。

目前idea更改全局项目设置的路径在New Project Setup -> Setting For New Project中,因为要想properties中写中文字符,为了避免乱码,要切换到utf-8。

1
2
3
4
5
6
7
8
9
10
11
12
13
# login_en_US.properties 英文对应文件
login.prompt=Please sign in
login.username=User name
login.password=Password
login.remember=Remember Me
login.bt = Sign in

# login_zh_CN.properties 中文对于文件
login.prompt=请登录
login.username=用户名
login.password=密码
login.remember=记住信息
login.bt =登录

完成之后,使用themeleaf获取值

1
2
3
4
5
6
<!-- 例子 -->

<h1 class="h3 mb-3 font-weight-normal" th:text="#{login.prompt}">Please sign in</h1>
<label>
<input type="checkbox" value="remember-me"> [[#{login.remember}]]
</label>

完成这些后,网页就会根据请求头中的位置信息自动切换语言。

4.4.4.1 手动切换语言

在页面放置两个超链接,跳到本页面并传递切换的语言信息

1
2
<a class="btn btn-sm" th:href="@{/index.html(l='zh_CN')}">中文</a>
<a class="btn btn-sm" th:href="@{/index.html(l='en_US')}">English</a>

创建一个实现了LocaleResovler的类

1
2
3
4
5
6
7
8
9
10
11
12
13
14
15
public class MyLocaleResolver implements LocaleResolver {
@Override
public Locale resolveLocale(HttpServletRequest httpServletRequest) {
/*从请求中获取要显示的语言*/
String l = httpServletRequest.getParameter("l");
// 获取默认locale对象
Locale locale = Locale.getDefault();
if(StringUtils.hasLength(l)){
logger.info(l);
String[] ls = l.split("_");
locale = new Locale(ls[0],ls[1]);
}
return locale;
}
}

最后把locale注册到MyMvcConfig类中

1
2
3
4
5
@Bean
public LocaleResolver localeResolver(){
// 如果没有注册,springboot使用自己的,如果我们自己注册了,springboot就会使用我们的。
return new MyLocaleResolver();
}

4.4.5访问控制

  1. 使用th:action="@{/user/login}"发送登录请求
  2. 控制器处理映射
    1
    2
    3
    4
    5
    6
    7
    8
    9
    10
    11
    12
    13
    14
    15
    16
    17
    18
    19
    @PostMapping(value = "/user/login")
    public String login(@RequestParam("username") String username,
    @RequestParam("password") String password,
    Map<String,Object> map, HttpSession session){
    /*带有RequestParam的参数没有被接收到, 就会报错 xxx not present */
    if(StringUtils.hasLength(username) && "aaaaaa".equals(password)){
    /* 登陆成功存值到session */
    session.setAttribute("loginUser",username);
    /* 通过重定向避免出现表单重复提交的问题
    重定向到一个不存在main.html
    然后由视图控制器绑定到要跳转的页面 */
    return "redirect:/main.html";
    } else{
    /* 存到map的值待会用模板引擎解析 */
    map.put("msg","用户名或密码错误");
    /* 未登录回到首页,这里的return是与template建立连接 */
    return "login";
    }
    }
  3. 建立一个LoginHandlerInterceptor拦截器拦截未登陆访问
    1
    2
    3
    4
    5
    6
    7
    8
    9
    10
    11
    12
    13
    14
    15
        <!-- 实现HandlerInterceptor -->
    public class LoginHandlerInterceptor implements HandlerInterceptor {
    @Override
    public boolean preHandle(HttpServletRequest httpServletRequest, HttpServletResponse httpServletResponse, Object o) throws Exception {
    Object user = httpServletRequest.getSession().getAttribute("loginUser");
    if(user == null){
    httpServletRequest.setAttribute("msg","请先登录~");
    /* 如果未登录,跳转到登录页 */
    httpServletRequest.getRequestDispatcher("/index.html").forward(httpServletRequest,httpServletResponse);
    return false;
    } else {
    return true;
    }
    }
    }
  4. 注册拦截器,在MyMvcConfig中注册,MyMvcConfig用于定制扩展springboot
    1
    2
    3
    4
    5
    6
    7
    8
    9
    10
    11
    12
    13
    14
    15
    16
    17
    18
    19
    20
    @Bean
    public WebMvcConfigurerAdapter webMvcConfigurerAdapter() {
    WebMvcConfigurerAdapter adapter = new WebMvcConfigurerAdapter() {
    // 视图映射器
    @Override
    public void addViewControllers(ViewControllerRegistry registry) {
    registry.addViewController("/index.html").setViewName("login");
    registry.addViewController("/").setViewName("login");
    registry.addViewController("/main.html").setViewName("dashboard");
    }

    /*注册拦截器*/
    @Override
    public void addInterceptors(InterceptorRegistry registry) {
    registry.addInterceptor(new LoginHandlerInterceptor()).addPathPatterns("/**")
    .excludePathPatterns("/index.html","/","/user/login");
    }
    };
    return adapter;
    }

4.4.5.1关于热部署

两个前提

  1. 是在debug模式下
  2. 禁用模板引擎的缓存(使静态页面生效),spring.thymeleaf.cache=false

4.4.6 员工列表模拟Restful

  1. 对应的uri:
    URI: /资源名称/资源标识 HTTP请求方式区分对资源CRUD操作

    普通CRUD(uri来区分操作) RestfulCRUD
    查询 getEmp emp—GET
    添加 addEmp?xxx emp—POST
    修改 updateEmp?id=xxx&xxx=xx emp/{id}—PUT
    删除 deleteEmp?id=1 emp/{id}—DELETE
  2. 请求架构

    实验功能 请求URI 请求方式
    查询所有员工 emps GET
    查询某个员工(来到修改页面) emp/1 GET
    来到添加页面 emp GET
    添加员工 emp POST
    来到修改页面(查出员工进行信息回显) emp/1 GET
    修改员工 emp PUT
    删除员工 emp/1 DELETE
  3. 处理获取所有员工列表的控制器

    1
    2
    3
    4
    5
    6
    @GetMapping("/emp/list")
    public String list(Model model){
    Collection<Employee> emps = employeeDao.getAll();
    model.addAttribute("emps",emps);
    return "emp/list";
    }
  4. 抽取页面公共元素的两种方式,dashboard是模板名称

    1. th:fragment="top-nav" 给公共元素的fragment命名,然后<div th:replace="dashboard :: top-nav"></div>使用。外层的这个div会被里面的代码覆盖
    2. 直接在要引用的地方<div th:replace="dashboard :: #sidebar"></div>使用选择器引入


springboot-尚硅谷
https://travelerentity.github.io/2021/12/springboot-尚硅谷/
作者
LinYun
发布于
2021年11月29日
许可协议